Adding Expiration Data to Your Site
It is possible to access and/or display expiration data from your site. This includes expiration dates, their quantities, and use within data. The easiest way to display this information is to use our Shopify theme editor integration, which allows the expiration data to be added as a section or block.
- Go to your Themes in the Shopify Admin
-
Find the theme you want to update and click "Edit theme"
-
In the theme editor, select the template you'd like to add expiration data to:
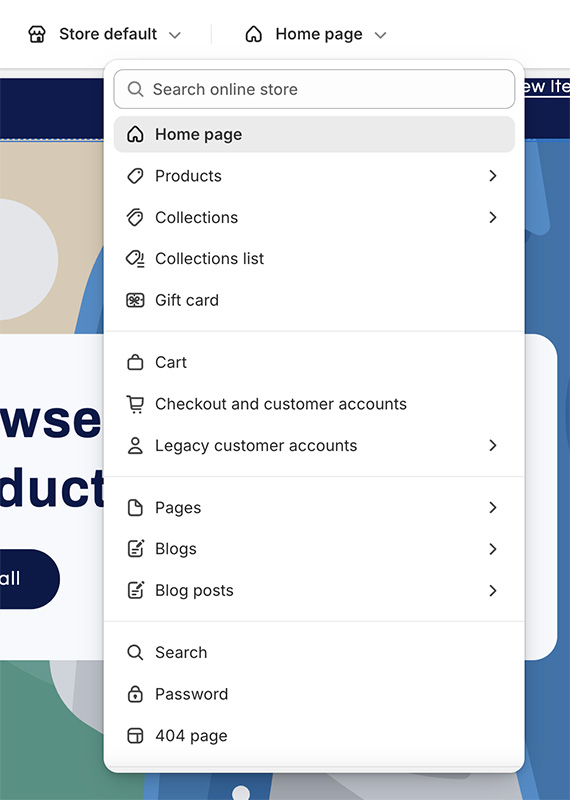
-
Select the desired location within the template. This can be done by hovering your cursor over the desired insertion area:
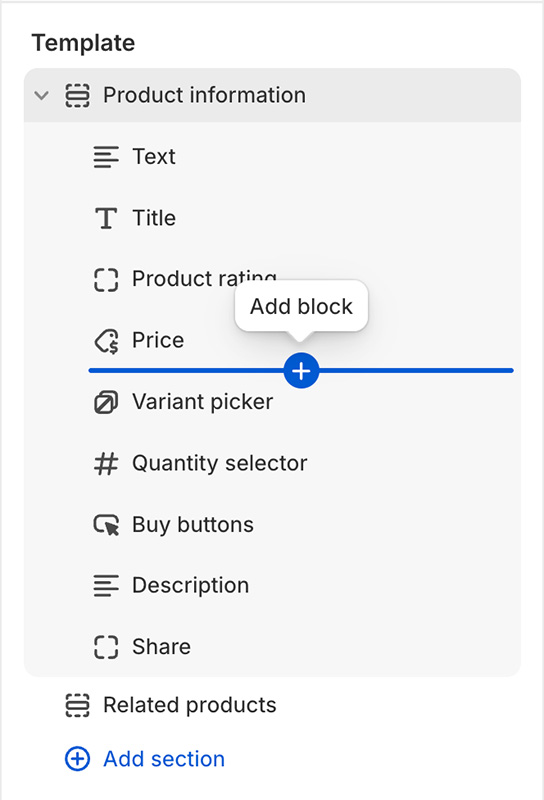
-
Click on the add block button and select Expiration Data from the Apps section:
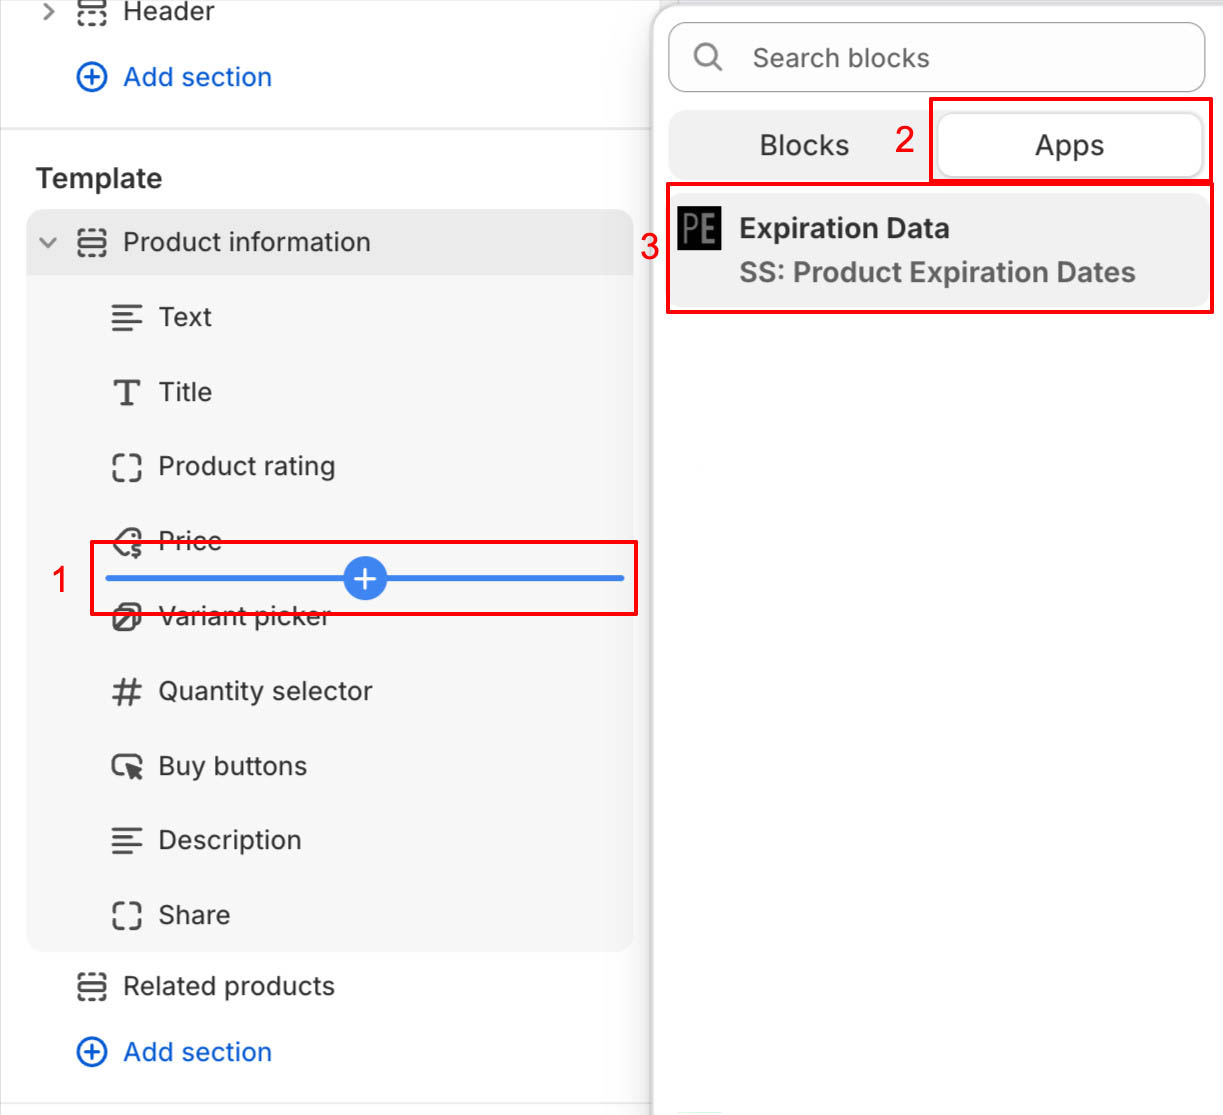
-
This will add an Expiration Data block to the selected template:
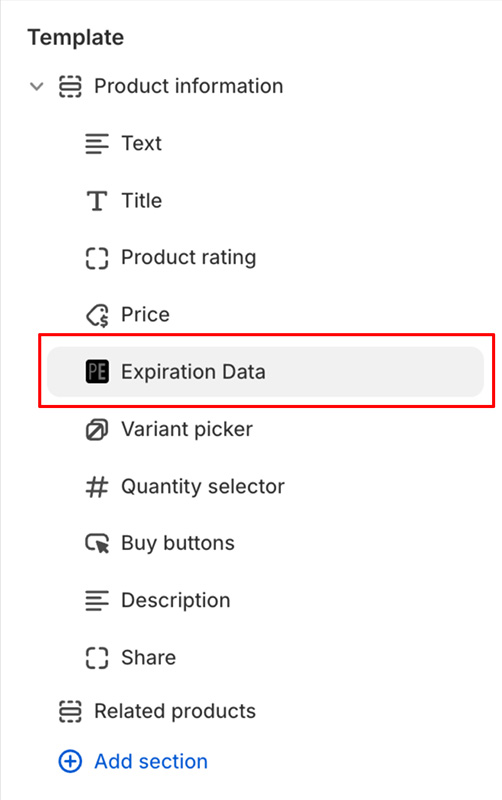
-
Click on the Expiration Data block to access additional configuration options. For products with multiple variants, the selected variant's expiration data will be shown. Multiple blocks can be added to address diffrent use cases. For example, you can add 1 block to show expiration dates, and another to show use within data.
-
Click Save
Adding our Snippet to Your Theme
Adding expiration data should be done via our Shopify theme integration. Explicitly adding the snippet is only necessary for specialized cases.
- Go to the Shopify Admin
- Open your theme's code editor
- Add a new theme file
- Click on the "snippets" directory
- Click "Add new snippet"
- For file name use
ss-product-expiration-dates - Click "Done"
- This will open a new blank tab in the editor named
snippets/ss-product-expiration-dates.liquid - Copy the code from our Liquid snippet and paste it into the tab
- Click Save
Displaying the Expiration Data
Once you've added our snippet to your theme the next step is to render it in the location you want the expiration data displayed. This can be done from the Shopify Admin via the customize theme page.
- Go to your Themes in the Shopify Admin
- Find the theme you want to update and click "Edit theme"
- In the theme editor, select "Products" then "Default product" (or whatever the desired template is)
- In the Template section click "Add block"
- Select "Custom liquid" or, if not available, "HTML" (note that the "HTML" block must support Liquid)
- If your theme does not have a "Custom liquid" nor "HTML" option you must render the snippet in your theme manually
- This can be done via the theme code editor
- If you need assistance please contact support
- Once selected you can move the Custom Liquid block to location you want the expiration data displayed
- Click on the Custom Liquid block you just added
- In the "Custom liquid" (or similar) field paste the desired render code, see Expiration Data Display Options for examples
- Click Save
Display the Expiration Dates Based on User Language/Region
If you are displaying your site in multiple languages you can change the expiration date format and text based on the currently selected language and/or region. Instead of rendering the expiration date via the default code:
{% render "ss-product-expiration-dates", product: product, prefix: "Best by:", format: "%B %d, %Y" %}
You can use the following code to check the selected language and/or region and display the expiration date and text in a specific format:
{% assign locale = request.locale.iso_code %}
{% assign lang = locale | split: "-" | first %}
{% if lang == "es" %}
  {% render "ss-product-expiration-dates", product: product, prefix: "Consúmase antes de:", format: "%d/%m/%Y" %}
{% elsif lang == "de" %}
  {% render "ss-product-expiration-dates", product: product, prefix: "Mindestens haltbar bis:", format: "%d.%m.%Y" %}
{% else %}
  {% render "ss-product-expiration-dates", product: product, prefix: "Best by:", format: "%B %d, %Y" %}
{% endif %}
Here if the language is Spanish ("es") the text "Consúmase antes de:" is shown and the date is displayed in DD/MM/YYYY format. If the language is German ("de") the text and date are displayed in a format suitable for German speakers. And, if the language is neither of the two, we display the date in a format suitable for English speakers.
If you want to display text based on the user's language and country, you can add a a case that checks the locale variable. In this example we show the date in YYYY/MM/DD format if the uesr is in Spain, and show the date in DD/MM/YYYY if they are in another Spanish-speaking country:
{% assign locale = request.locale.iso_code %}
{% assign lang = locale | split: "-" | first %}
{% if locale == "es-ES" %}
 {% render "ss-product-expiration-dates", product: product, prefix: "Consúmase antes de:", format: "%Y/%m/%d" %}
{% elsif lang == "es" %}
  {% render "ss-product-expiration-dates", product: product, prefix: "Consúmase antes de:", format: "%d/%m/%Y" %}
{% elsif lang == "de" %}
  {% render "ss-product-expiration-dates", product: product, prefix: "Mindestens haltbar bis:", format: "%d.%m.%Y" %}
{% else %}
  {% render "ss-product-expiration-dates", product: product, prefix: "Best by:", format: "%B %d, %Y" %}
{% endif %}