Selling Expiring Products for a Discount
Products can be discounted when they contain an inventory batch within an expiration window. There are two ways to configure discounts: 1) the legacy method 2) rulesets. Rulesets are the preferred method and allow one to configure multi-phased discounts. For example, discount a product by 10% 100 days before expiration then discount it by 30% 5 days before expiration.
See the documentation below for each type.
Rulesets
Rulesets are only available under the Platinum Plan
Rulesets allow one to define a set of critiera to apply to a product, and execute actions when the criteira matches. Rulesets are not only for discounts, they can be used to add or remove tags, change a product's title, and more! Let's look at an example. Say you want to discount a product based on the following:
- 100 days before expiration: discount by 10%
- 14 days before expiration: discount by 30%
- Day of expiration: discount by 50%
- 5 days after expiration: remove expired batches
Performing this can be achieved by creating a single ruleset with 4 rules. Each rule will contain the desired criteria (100 days before, 14 days before, etc...) and actions (discount by 10%, discount by 30% etc...). When a rule's criteria matches its associated actions will be executed.
Note: discount percentages are based off the product's price at the time the discount is applied. If you want to base it off the original, pre-discount price, you must add a "Remove Discount" action alongside the "Add Discount" action at each phase.
100 days before expiration: discount by 10%
- Go to the ruleset page
- Click "Add ruleset"
- From the New Inventory Ruleset page you can give the ruleset a name
- Click the Save
- This will take you to the new rulesets' page where the discount rules can be added
- Click "Add rule"
- From the Criteria field select "Before an Inventory Batch Expires"
- In the "Days before expiration" field enter 100
- Below, in the Actions section, select "Add Discount"
- In the "Discount percentage" field enter 10. To set the compare at price on Shopify to the pre-discount price check "Use regular price as compare at price"
- Click Save
- Now the ruleset has a single rule, we must add 3 more
14 days before expiration: discount by 30%
- From the rulset's Edit Ruleset page, click on "Add rule"
- From the Criteria field select "Before an Inventory Batch Expires"
- In the "Days before expiration" field enter 14
- In the Actions section, select "Add Discount"
- In the "Discount percentage" field enter 30
- Click Save
- Now the ruleset has 2 rules, we must add 2 more
Day of expiration: discount by 50%
- From the rulset's Edit Ruleset page, click on "Add rule"
- From the Criteria field select "After an Inventory Batch Expires"
- In the "Days after expiration" field enter 0. This sets the criteira to the day the product expires
- In the Actions section, select "Add Discount"
- In the "Discount percentage" field enter 50
- Click Save
- The ruleset has 3 rules, 1 more to go!
5 days after expiration: remove expired batches
- From the rulset's Edit Ruleset page, click on "Add rule"
- From the Criteria field select "After an Inventory Batch Expires"
- In the "Days after expiration" field enter 5. This sets the criteira to the day the product expires
- In the Actions section, select "Remove Inventory Batch"
- Click Save
The resulting ruleset should look like the following:
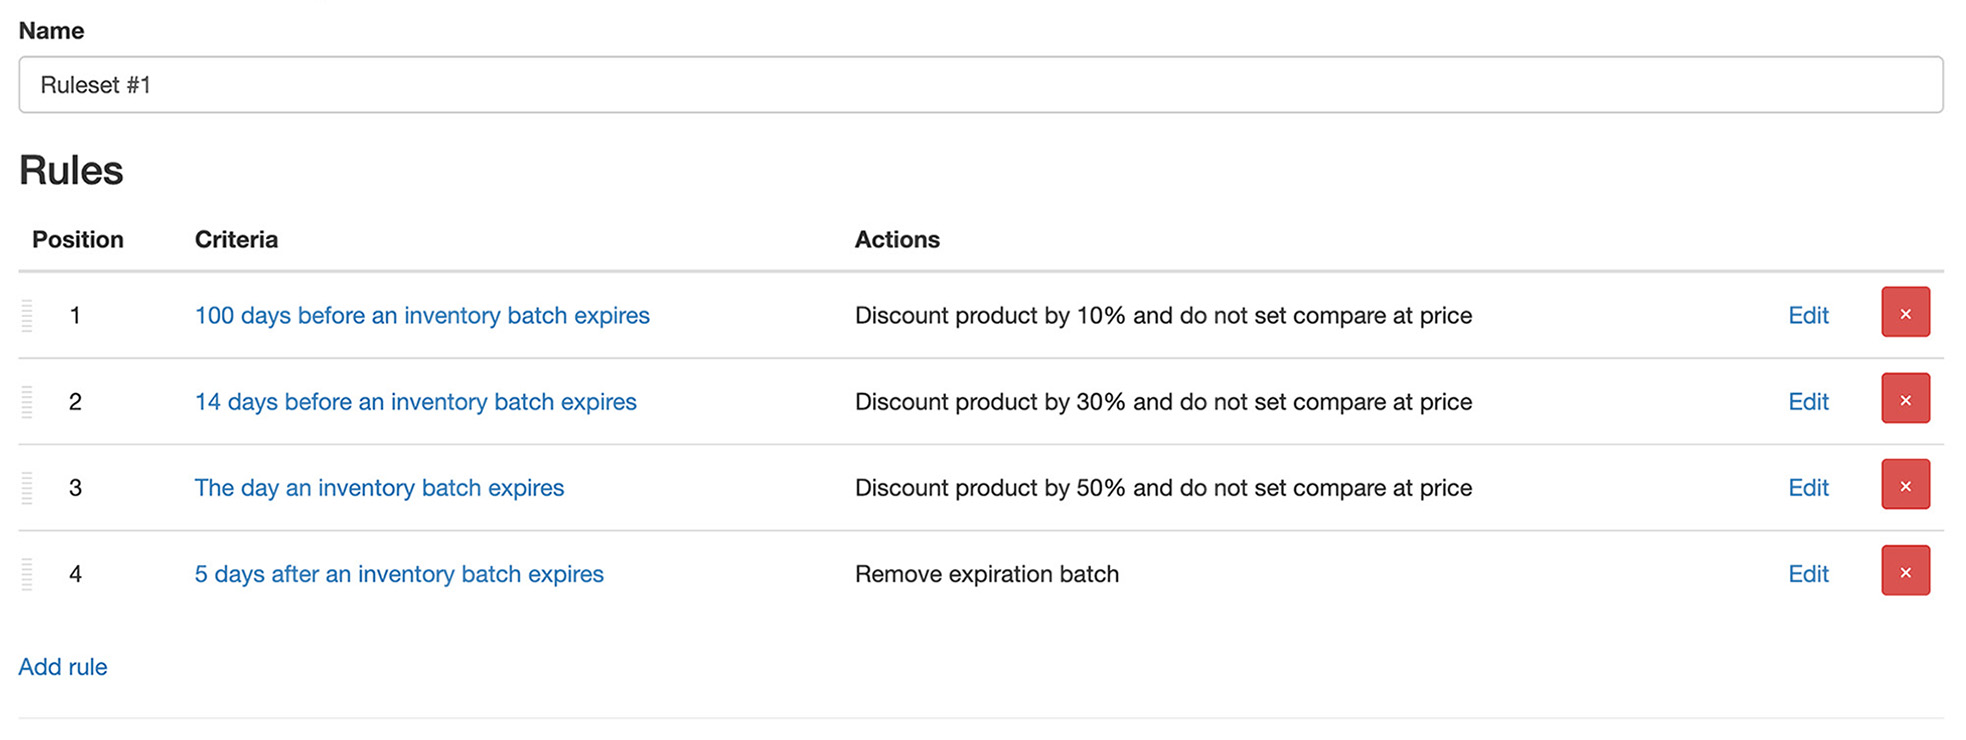
This ruleset will apply to all products in your store. You can limit it to specific products or variants by selecting "With Matching Product" criterium when creating a rule. If the expiring batch's quantities are sold the ruleset will be reverted and the product/variant restored to the price at the time Rule 1 matched.
Unless the "Apply retroactively" option is selected (see below), a ruleset's rules must match in the order they're defined. For example, Rule 3 will not match unless Rules 1 and 2 have matched.
Retroactive Matching
Normally a ruleset can only start applying to an inventory batch by matching its first rule. If a batch is already past that rule's timing —for example the ruleset was created after the batch was added— the ruleset will never apply to it.
Selecting the "Apply retroactively" option lets a batch join the ruleset at whichever rule matches its current date, and applies every earlier rule's actions at the same time. Given the ruleset in the above example, a product 10 days away from expiring will have Rules 1 and 2 and their associated actions applied in a single pass. A batch that expired 2 days ago will have Rules 1, 2 and 3 applied, even though Rules 1 and 2 no longer match on their own.
After these initial matches rules will be applied normally, i.e. as they would be if "Apply retroactively" was not selected.
Legacy Discount Method
Legacy discounts are only available under the Pro Plan
Legacy discounts can be configured by a product's collection, its product type, or on the product itself. When a discount is active it will last until all expiring quantities are sold or until the applicable expiration date(s) are changed so that they are no longer within the configured discount window.
By default the discount will be applied to all available quantities. For example, if you have 10 products and only 3 are expiring offering a discount will still allow the user to purchase 10 for the discounted price. This is due to how Shopify product pricing works. If you wish to offer a discount only for the expiring quantity there are several options. Please contact support to discuss the options and determine what will work best for your store.
It may take several minutes for the discount or the restored price to appear on your site.
Enabling Per Product
- For the product you want to discount enter its expiration dates into the app
- On the product's page in the app click the "Discounts" tab
- On the "Discounts" tab check "Offer a discount when an inventory batch is within its expiration window"
- In the "Discount percentage" field enter the percentage by which you want to discount the product's regular price.
For example, if a product has a price of 50 and 10 is entered, the product will be sold for a price of 45 when the discount is active. - In the "Discount days before expiration" field enter the number of days before a product expires you want to activate the discount.
For example, if a product has an expiration date of January 15th and 10 is entered, the product will be discounted staring on January 5th. - Click the Save button
Enabling by Collection
- For the product you want to discount enter its expiration dates into the app
- On the product's page in the app click the "Discounts" tab
- On the "Discounts" tab check "Offer a discount when an inventory batch is within its expiration window"
- In the "Discount percentage" field enter the percentage by which you want to discount the product's regular price.
For example, if a product has a price of 50 and 10 is entered, the product will be sold for a price of 45 when the discount is active. - Do not enter a value into the "Discount days before expiration" field. This will be entered in a later step when configuring the collection
- Click the Save button
- In the app's settings go to discounts
- Go to the "By Collection" section
- In the "Title" field select the collection you want to configure the discount for
- In the "Days before expiration" field enter the number of days before products in the collection expire. This will determine when to activate the discount.
For example, if a product has an expiration date of January 15th and 10 is entered, the product will be discounted staring on January 5th. - To add a different collection click the "Add more" link
- Click the Update button
Enabling by Product Type
- For the product you want to discount enter its expiration dates into the app
- On the product's page in the app click the "Discounts" tab
- On the "Discounts" tab check "Offer a discount when an inventory batch is within its expiration window"
- In the "Discount percentage" field enter the percentage by which you want to discount the product's regular price.
For example, if a product has a price of 50 and 10 is entered, the product will be sold for a price of 45 when the discount is active. - Do not enter a value into the "Discount days before expiration" field. This will be entered in a later step when configuring the product type
- Click the Save button
- In the app's settings go to discounts
- Go to the "By Product Type" section
- In the "Title" field select the product type you want to configure the discount for. Only product types for products that have been entered into the app are show.
- In the "Days before expiration" field enter the number of days before products with the product type expire. This will determine when to activate the discount.
For example, if a product has an expiration date of January 15th and 10 is entered, the product will be discounted staring on January 5th. - To add a different product type click the "Add more" link
- Click the Update button